

by Garen Robie
How To Laser Engrave Photos
The laser engraver by far Ignite Studio’s most popular piece of equipment. It’s great for cutting out shapes and scanning simple designs. You can make holiday ornaments, key chains, knickknacks, 3-D puzzles, game pieces, and so much more! You’ll need to complete Ignite’s Laser Engraver Certification Course to get started. For current laser engraver users in Ignite, who want to take their projects to the next level, here is a step-by-step guide to laser engraving photos and images.
Choosing and Preparing a Photo
Select an image that has high contrast and full values. Stark black and white photography works well. If there are multiple planes and fields of color, a lot is lost in translation when you convert the image to grayscale.

This example photo will work nicely for what we’re trying to accomplish. There are some filters and effects that can be added to go further and accentuate details. Ignite offers HP Elitebooks for checkout in our space. Each comes equipped with a photo editor that has options like applying filters to give different swatches of how your image could look. Here I’ve applied a ‘Vanilla’ filter.

You can also make adjustments to the clarity, lighting exposure, and add things like vignettes and halos to sharpen or soften your image.

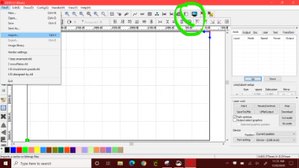
Settings for Laser Engraving Photos
After you’ve done the initial editing, open RDWorks to set your project up to run through the laser engraver. First you’ll need to import the image that you’ve worked so hard on. Next you’ll need to select the image with your cursor and click the very small button on the top tool bar called “BMP”. It’s green and very small, but I assure you it’s there.

Utilizing the “bitmap handle” feature allows you to do many things. However, while engaged in the BMP, you can’t undo things. If you apply something to the image you don’t like, hit ‘cancel’ and start anew. You have toggles to the ‘brightness’ and ‘contrast,’ but in order to see the effect, you need to select your percentages and click ‘apply to image.’ If the image is over bright or too dark when you apply your selection, hit ‘cancel,’ and try again. If you’ve done enough work in the previous photo editor, you won’t have to utilize the brightness or contrast toggles very much at all.

Next, increase your output resolution to between 1000-2000—it usually starts somewhere near 62. After you apply this to your image, the real work begins. Use the ‘dither’ fields to find an effect that will convey your image. Usually, it’s best to start by applying the ‘sharpen’ dither, followed by the ‘gray scale’ or ‘black and white.’

Then you can apply a ‘net graphic.’ Adjust the frequency, which effects the ‘matrix’ or ‘net’ pattern. The best frequency tends to lie somewhere between 50-70%. Once you find a good rendering of your image, check the simulation monitor in the tool bar. This will give you a good indication of how your project will turn out.

Sending Your Project to the Laser Engraver
Now you’re ready to to make sure your settings are correct for your media. In the Fab Lab, we have many material samples to help you along with basic parameters, but a lot of success comes through experimentation. The media used for this project was 12’x20’ plywood, which Ignite sells for $3/sheet. The following settings are for that media specifically.
- For image, set the layer to ‘scan’ at a speed of 200 with the power set at a low of 10 and a high of 40.
- For the outline, set the layer to ‘cut’ at a speed of 4 and a power of 80 (low and high).
- For the text that indicates settings, set the layer to ‘cut’ at a speed of 200 and a power of 25 (low and high).
Don’t forget to add tape to your project to prevent burning around the edges. After all of this, you should have a successful project.

If you hit any bumps in the road, just remember that FAIL is simply your First Attempt In Learning. If you have more specific questions, you can always book-an-expert, and someone from the Ignite staff will be happy to assist. Happy making!
