
(142)")
by Jared Hart
When start learning Adobe Illustrator things can be overwhelming. In this article, I’m going to discuss some of the features that I use very frequently that I remember struggling with when first getting started in the program. Read on to learn how to use Adobe Illustrator’s shape building tools. Don’t forget, you can access the entire Adobe Creative Suite for free in Ignite Studio’s Digital Media Labs.
How to use Adobe Illustrator’s Shape Building Tools
First things first: find the “Pathfinder” tool bar. If you’re anything like I was when first learning the program, then you’re probably familiar with clicking each button in this toolbar until you get the results you were hoping for. I would have saved myself tons of time if I had just slowed down for a minute and researched how each button works.
If you don’t see the pathfinder toolbar, then you can open it by selecting the “Window” drop-down at the top and selecting “Pathfinder.”
Some of these tools have different outcomes based on your layer order. If you are using multiple boxes that are the same color, make sure to look at your layers panel so you know which layer is on top.
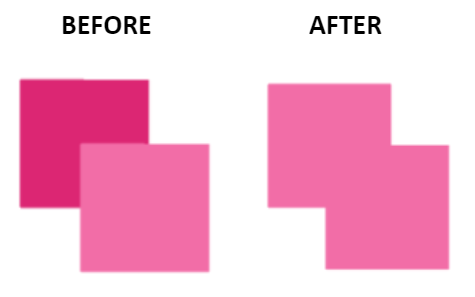
Unite/Add
![]() The ”Unite” tool simply joins all selected shapes into one single shape.
The ”Unite” tool simply joins all selected shapes into one single shape.
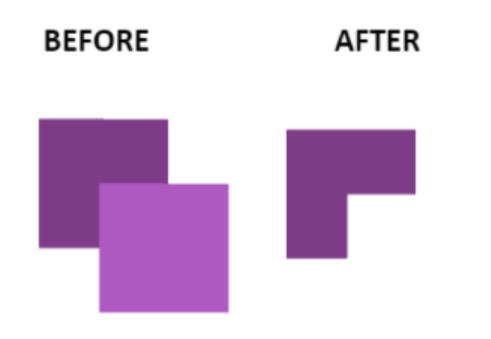
Minus Front/Subtract
 The ”Minus Front” tool removes the front shape and all areas that overlapped with the shape behind it.
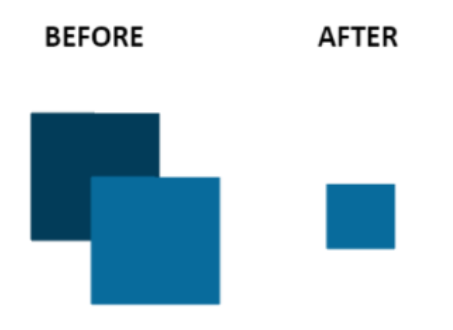
Intersect
![]() The ”Intersect” tool leaves you with a new shape that consists only of the areas where your two shapes overlap
The ”Intersect” tool leaves you with a new shape that consists only of the areas where your two shapes overlap
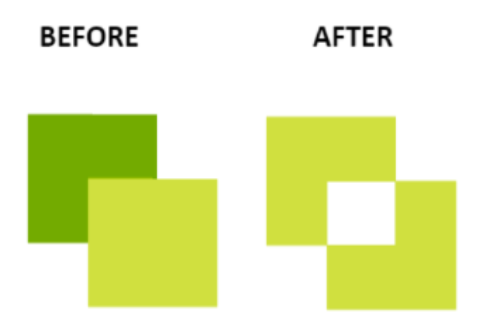
Exclude
![]() The ”Exclude” tool is the opposite of the intersect tool. Leaving you with a new shape that consists of the areas where your two shapes did not overlap.
The ”Exclude” tool is the opposite of the intersect tool. Leaving you with a new shape that consists of the areas where your two shapes did not overlap.
These tools may seem a little complicated at first glance, but after using them a bit, you will quickly discover how useful they can be. You can also use The Boolean Game to practice trying to make shapes using these four tools.
Shape Builder Tool
 An alternative method to achieve some of these same results is to use the ”Shape Builder Tool.” After selecting all of the shapes you want to manipulate, select this tool found on the left toolbar or by using the shortcut (Shift+M).
While using this tool, you can click and drag over areas you’d like to unite. Alternatively, you can hold down the Option key (Mac OS) or Alt key (Windows) to switch to subtraction mode. Now as you click or drag over shapes, they will be removed.
I hope this has helped you feel a little more comfortable building shapes within Adobe Illustrator. Happy Making!
